Purpose
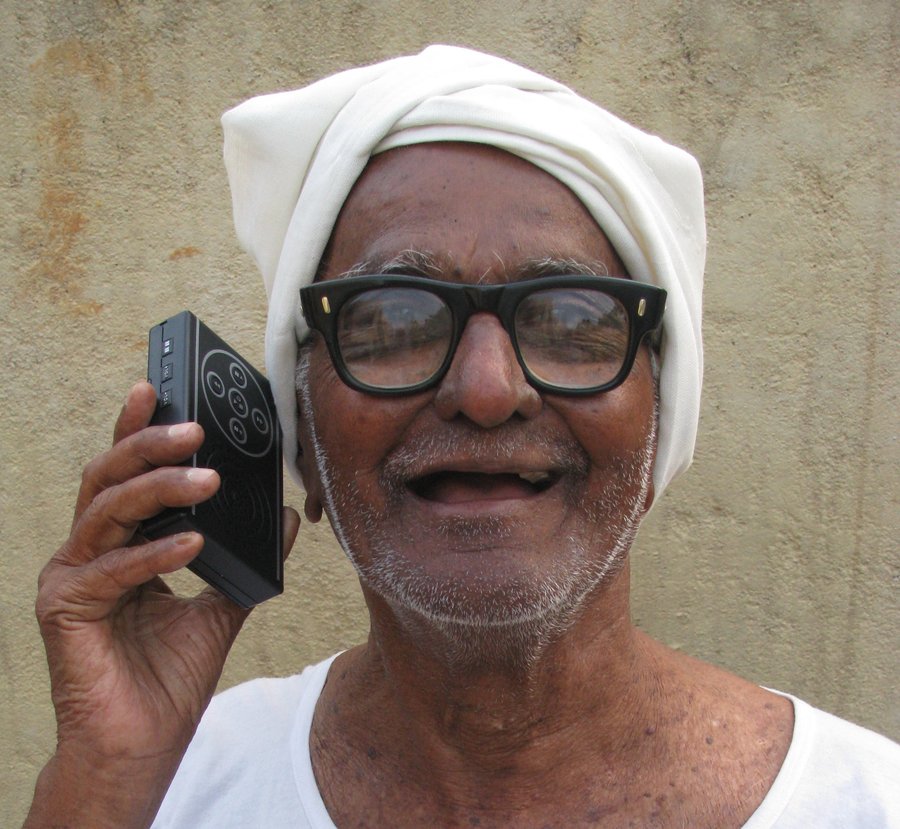
The purpose of this ministry is to design portable electronic audio Bible players to make God's word easily accessible in audio form.
It is estimated that a billion or more people in the world are illiterate and thus have no access to the Holy Bible, even if it is printed in their own language. Many of these are people from oral cultures that have no written language. The best way for illiterate people to access the Holy Bible is via audio. Once an illiterate man has heard God's word and understands what a great treasure it is, he is likely to want to learn to read it.
There are also a couple of billion more people who can read but who do not for one reason or another. These people would also benefit from being able to hear God's word.
Blind people also benefit greatly from listening to God's word. Not all blind people can read Braille and even for those who can read Braille, audio is far more convenient.
Finally, even for those of us who do read frequently, there are times when our hands and eyes are otherwise occupied (for example when we are driving), but we have time to listen. A great way to use that time is to listen to God's word.
OSAB
Open Source Audio Bible
Introduction
The following documents the development of a prototype audio Bible player that has been published as open source hardware, firmware and software with the hope that it can start a discussion around the requirements and design of a production version of an open source audio Bible player that can be used freely by anyone wanting to produce and distribute audio Bible players anywhere in the world.
The hardware, firmware and software source files are hosted at:
github.com/theaudiobible
OSAB Forum
If you would like to give constructive feedback and direction on design, please feel free to contribute on our Github discussion forums here:
Production - printed circuit board (PCB)
Coming soon, Lord willing.
Production - enclosure
This enclosure has been designed to be printed on a common 3D FDM printer. After finalising the enclosure design, the PCB will be designed. If the interest and demand justifies it, an injection-moulded enclosure could be designed to suit the same PCB.
The following are links to 3D models, firstly of the entire enclosure and then of the component parts. They should open in a new window when you follow a link - please just close the window (or press the Back button on a mobile phone) before following the next one. Please note that the first few links have to load large files, so will take a while to load before you see the models, specially the entire enclosure.
To rotate the model, just click/tap and drag on the model.
Prototype - single-sided board
The prototype was designed for the PCBA (printed circuit board assembly) to be produced by hand. That is why it was designed for all the components to be placed on one side of the PCB. The bottom side of the PCB is a solid copper ground plane. This was to avoid alignment issues between the top and bottom layers since the board was etched and drilled by hand.
The schematic and PCB layout were designed using KiCad and are on a branch called single-sided hosted here: github.com/theaudiobible/osab-electronics/tree/single-sided
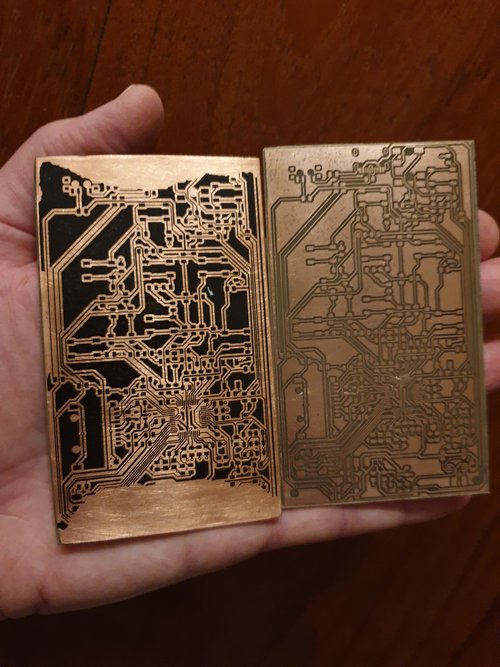
The above photo shows an unetched board on the left with laser printer toner transferred using the process described here next to an etched board on the right. The toner transfer failed on parts of the board on the left (mostly top and bottom). The board on the right was etched with mixture of hydrogen peroxide and hydrochloric acid as per this article.
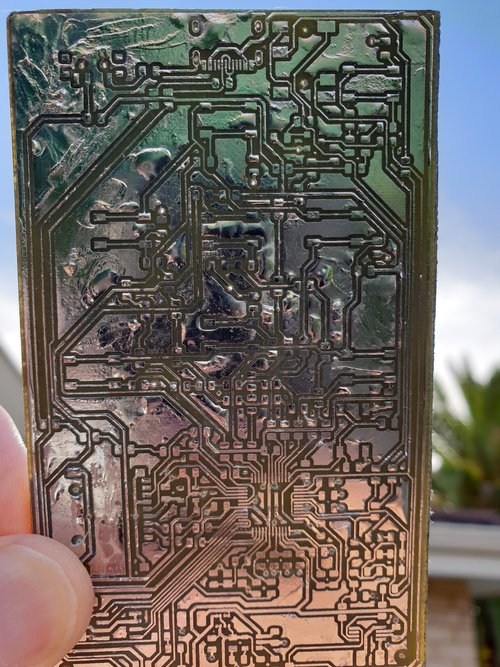
The above photo shows the PCB after the copper has been tinned by hand soldering - it's a bit messy, but it does the job.
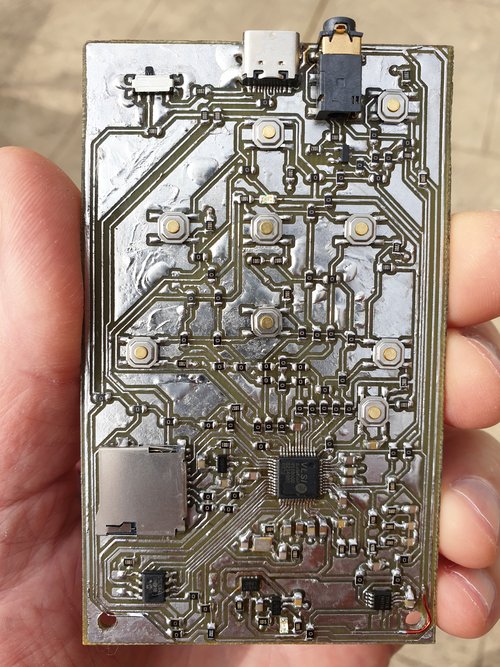
The above photo shows the fully assembled and functioning PCB with all components soldered by hand.
Prototype - enclosure
This enclosure was my first real attempt at enclosure design, so there is huge room for improvement and any feedback and guidance would be greatly appreciated. Note that it was designed in conjunction with the single-sided board above. The production board will be double-sided and hence much smaller (half the size or less). Thus, the production enclosure can also be made smaller or be organised differently - for example, placing the speaker at the front.
It would be ideal if the production enclosure could be designed such that it could be printed on a common 3D FDM printer or mass-produced using injection moulding - I'm not sure if this is possible and would appreciate feedback and guidance.
The following are links to 3D models, firstly of the entire enclosure and then of the component parts. They should open in a new window when you follow a link - please just close the window (or press the Back button on a mobile phone) before following the next one. Please note that the first few links have to load large files, so will take a while to load before you see the models, specially the entire enclosure.
To rotate the model, just click/tap and drag on the model.
Previous Designs
m3 audio Bible player
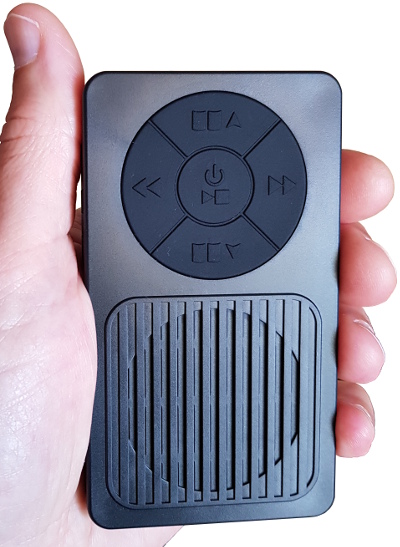
The m3 is the latest addition to the iBible stable. It uses the SC614 chip (same as the S100), but includes a built-in rechargeable lithium battery, an amplifier driving a 1W 8 ohm speaker (much louder than the S100) and an optional solar panel.
It also includes a button lock - something that was lacking on the S100. This can help prevent accidentally switching the device on when the play button is bumped unintentionally.
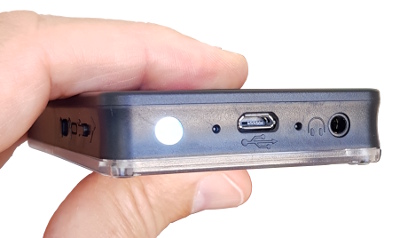
The top view shows a small bonus feature - an integrated torch LED - along with the micro-USB socket for charging, two status LEDs (the small holes) and an earphone socket.
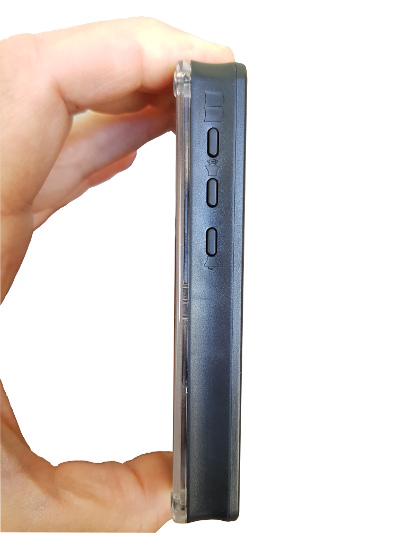
The left view shows (from bottom to top) the volume buttons and the Category button (OT / Psalms / NT / Extra).
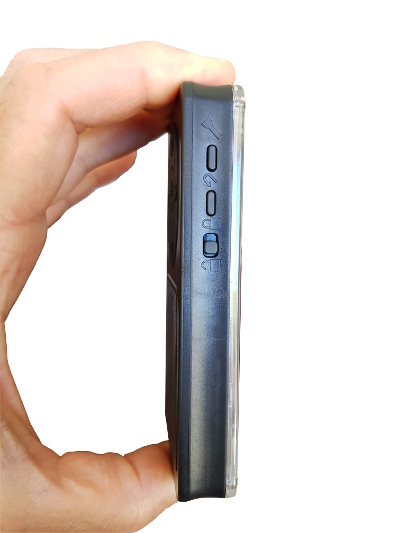
The right view shows (from bottom to top) the button lock, the reset button and the torch button.
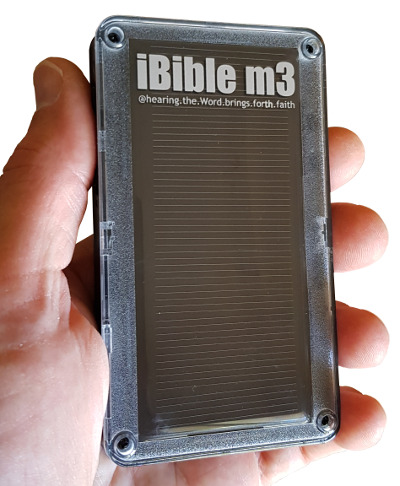
The back view shows the optional solar panel.
m7 audio Bible player
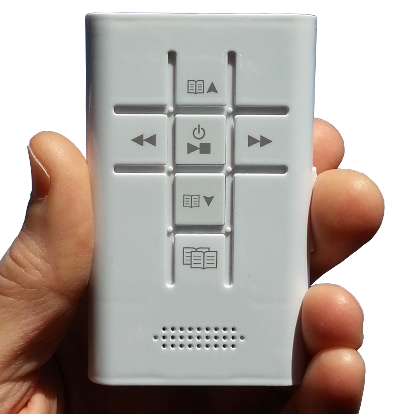
The m7 uses the vs1000 chip from VLSI.
The m7 has all the same functions as the S100 plus some extra features like bookmarking and earphone spatial processing. It uses Ogg Vorbis as the file format and can produce much higher quality sound (approaching CD quality audio). The storage medium is microSD or microSDHC, so vast quantities of audio can be accessed using this player (potentially thousands of hours of audio). The use of Ogg Vorbis also makes it suitable for high quality reproduction of music.
The m7 has an internal rechargeable lithium (LiPo) battery which is recharged via a mini USB port at the top of the device.
The m7 is very compact, being about the size of a credit card, but 13 mm thick. It has a built-in speaker as well as a standard 3.5 mm stereo earphone socket. It also includes a button lock at the top so that you can avoid losing your place from accidental button presses while it is playing or prevent it from being switched on accidentally while it is in your pocket or bag.
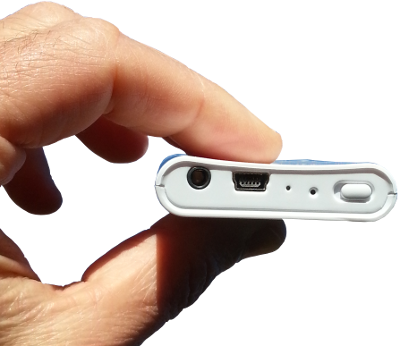
The button functions are as follows:
- Power/Play/Pause
- Next Book/Next Bookmark
- Previous Book/Previous Bookmark
- Next Chapter/Scroll Forward
- Previous Chapter/Scroll Backward
- Category Selection/Save Bookmark
- Volume+/Repeat Chapter/Earphone spatial processing
- Volume-/Repeat Chapter/Earphone spatial processing
m5 audio Bible player
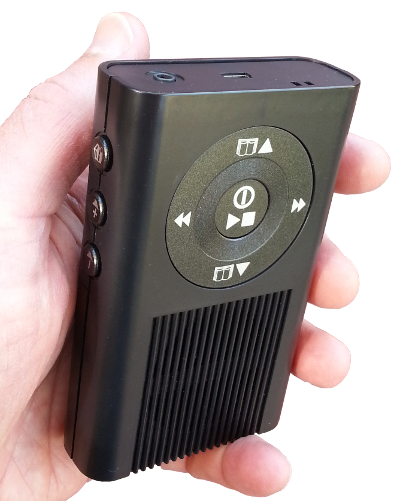
The m5 uses the vs1000 chip from VLSI.
The m5 has all the same functions as the S100 plus some extra features like bookmarking and earphone spatial processing. It uses Ogg Vorbis as the file format and can produce much higher quality sound (approaching CD quality audio). The storage medium is microSD or microSDHC, so vast quantities of audio can be accessed using this player (potentially thousands of hours of audio). The use of Ogg Vorbis also makes it suitable for high quality reproduction of music.
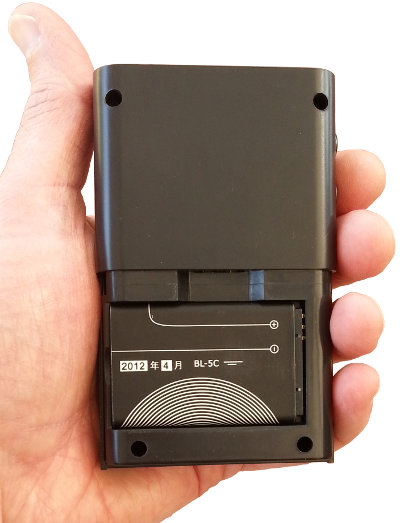
The m5 uses a BL-5C lithium battery (as used in many Nokia cellphones) which is recharged via a mini USB port at the top of the device.
The m5 is a similar size to the S100 - 110x68x25 mm. It has a built-in speaker as well as a standard 3.5 mm stereo earphone socket. The m5 is considerably louder than the S100 and the m7 and is suitable for listening by a reasonably large group of people.
The button functions are as follows:
- Power/Play/Pause
- Next Book/Next Bookmark
- Previous Book/Previous Bookmark
- Next Chapter/Scroll Forward
- Previous Chapter/Scroll Backward
- Category Selection/Save Bookmark
- Volume+/Repeat Chapter/Earphone spatial processing
- Volume-/Repeat Chapter/Earphone spatial processing
S100 audio Bible player
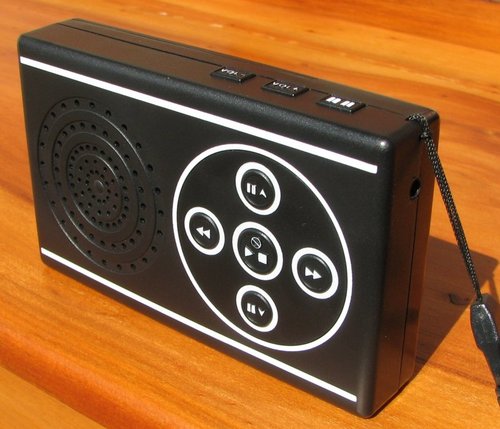
Towards the end of 2006 a brother in Christ from Singapore offered to produce the SC-614 based audio Bible player in China. That's how the S100 was born and was marketed under the iBible brand.
The S100 audio Bible player was in production for several years since 2008. It has a built-in speaker that is loud enough for group listening in a quiet room as well as a 3.5 mm earphone socket for private listening. It is powered by a pair of AA batteries and can achieve well over 200 hours of playing time from a pair of good alkaline batteries. This is normally sufficient to listen to the entire Bible (OT + NT) three times over. It can also use rechargeable NiMH batteries, which could be useful in remote situations where disposable batteries are not readily available. In such cases NiMH batteries with a solar charger would serve very well.
The button functions are as follows:
- Stop/Play
- Next Book
- Previous Book
- Next Chapter/Scroll Forward
- Previous Chapter/Scroll Backward
- NT/OT (category selection)
- Volume+
- Volume-
The S100 uses CELP for speech compression and stores the audio data on an SLC NAND flash chip that is soldered directly onto the printed circuit board. The fact that the memory chip is soldered onto the PCB and cannot be easily removed and re-used for other purposes like an SD card makes it attractive to missionaries who want to give the device away without being concerned that the memory card might be removed and used for other purposes.
Maids in Lebanon
Here is a video clip from Stephanie Christianson about how she used the S100 in her ministry to maids in Lebanon.
Video clip on how to use the S100
This is a video clip on how to use the S100.
Arabs for Christ
Audio Bible comparison at Arabs for Christ
High Speed USB NAND flash programmers for the S100/m3 audio Bible players
For uploading audio content to the NAND flash chips in the first few prototypes, some parallel port programmers were made to connect via the printer port that computers of the past used to have. The first one was build with discrete transistors (for voltage level translation) on a piece of veroboard. Later ones used voltage level translation chips.
As you can imagine, writing hundreds of megabytes of data via a printer port is by no means quick. So, there was a need to design a high-speed USB 2.0 (480 mbps) programmer. This used the Cypress cy7c68013a EZ-USB® FX2LP™ USB microcontroller. The GPIF was programmed with custom waveforms to provide the signalling to interface to the NAND flash chip. Firmware was written in C to handle NAND flash addressing, reading, writing, erasing, etc.
The first programmer involved a bit of mechanical design as well. It had spring probes for making contact with the S100 PCB and needed a clamp to hold the S100 PCB against the spring probes:
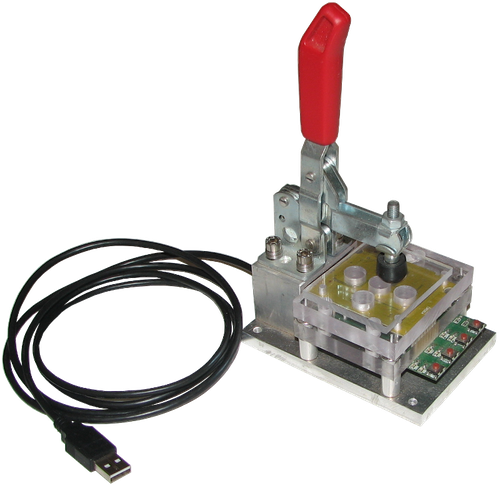
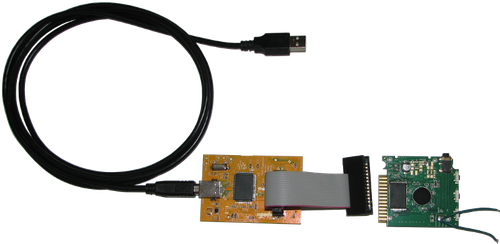
We decided in a later version of the S100 to use an edge connector instead, so the programmer was modified appropriately:
For the m3, we reverted back to a programmer with spring probes since these are more reliable for highly repetitive use.
On the PC side, software was written in C for uploading Bible narrations to the NAND flash chip on the S100 PCB via the NAND flash programmer. This software has been refined over time to improve upload speed and verify the integrity of the uploaded data.
Third Prototype
This was a prototype developed for Christian Outreach Media (COM). It was based on the second prototype, using the SC-614 processor. COM produced a narration of the Zulu Bible (OT + NT) that was available on 88 CDs (IIRC). By providing it on a portable digital audio Bible player, there was a cost saving as well as the convenience factor of having the media and player in one pocket-sized device.
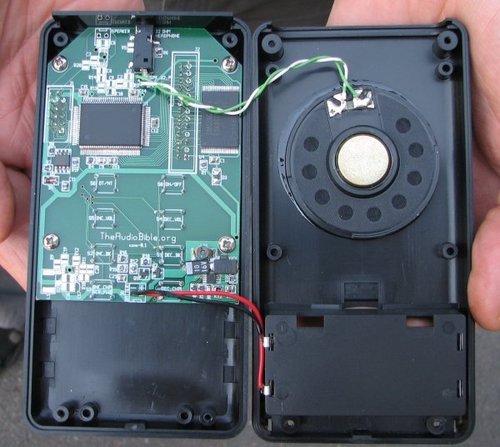
The printed circuit board (PCB) has a number of component footprints that were not populated - these were placed there for experimental purposes.
In the bottom right-hand side of the PCB you can see the switching regulator.
The speech processor is the large chip just above center to the left. This was the OTP (PROM) version of the SC-614. The production version of this chip is smaller.
The small chip just below the speech processor to its left is a non-volatile memory chip (FRAM) for storing the current location in the narration so that when the audio Bible is powered off and on again, the narration continues at about the same point.
The large chip on the right side of the PCB is the flash memory. This particular one is a 1 gigabyte chip, but a half gigabyte chip would be more than sufficient for most OT + NT narrations. The Zulu narration is particularly long at over 99 hours (OT + NT), but even that could be made to fit into a half gigabyte flash without a significant loss in sound quality.
At the top of the PCB in the center is the headphone jack socket which could also be used to feed an amplifier.
Second Prototype
For the second prototype it made sense to use the SC-614 speech processor from Sensory (ex msp50c614 from Texas Instruments) since it would replace the msp53c691 slave speech processor and the mc68hc908jl3 MCU in the first prototype with one device.
This prototype was initially completed on 29 October 2004 and became the basis for the production model - the S100.
Development kit
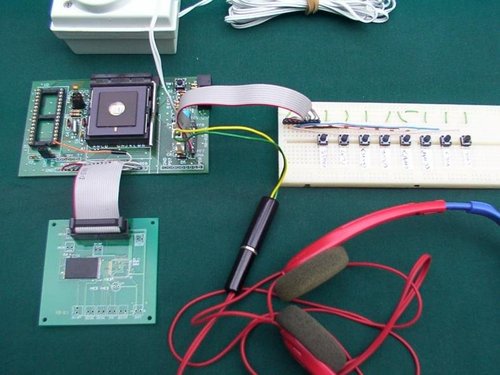
This is the development kit for the second prototype. The white box in the top left-hand corner is the power supply. The green circuit board in the center left is the evaluation board for the speech processor - you can see the processor in the center of that board. From that board, there is a ribbon cable to the board below (board from the first prototype) which contains the flash memory chip. To the right you can see the headphones and above that is a breadboard with pushbutton switches for pause, play, next book, previous book, next chapter, previous chapter, increase volume, decrease volume.
Completed Prototype
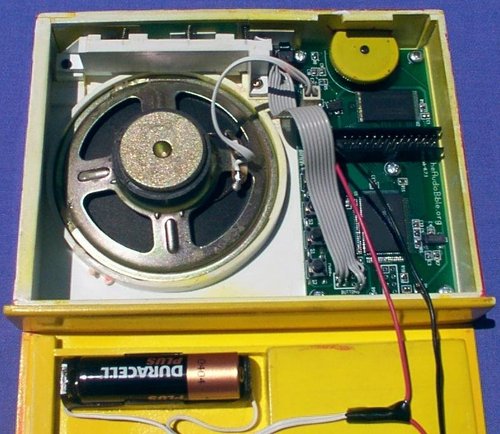
This is the completed second prototype, showing the circuit board, 1/2 Watt speaker, analogue and digital volume control, etc. The large chip near the top of the picture is the flash memory chip that contains the Bible narration and the large chip below that is the speech processor chip. The enclosure was designed and hand-built by Mark Hoekstra of Talking Bibles International.
First Prototype
The first prototype portable audio Bible player developed in this ministry used the msp53c691 slave speech processor from Texas Instruments together with a mc68hc908jl3 MCU from Motorola.
It was quite crude, as you can see from the photos. The enclosure was an off-the-shelf model made in Taiwan. The holes for the speaker, button and switches had to be hand-drilled.
The mc68hc908jl3 MCU accepted user input via the pushbuttons on the front and read the CELP speech data from the NAND flash chip and fed it to the msp53c691 speech processor which would then play the speech via the speaker or headphones.
The speech data for the Bible narration was uploaded to the NAND flash chip via a custom-made parallel port NAND chip programmer.
This prototype was completed on 10 October 2003 and given to Mark Hoekstra from Talking Bibles International who kindly supplied a copy of their KJV narration by Dan Wagner that was used in the development of this player.
Front
Here is a photo of the front showing the buttons for navigating books, chapters, etc:

Back
This is the back, showing the speaker holes:

Battery compartment
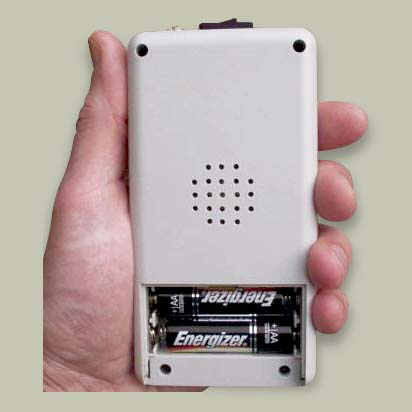
This is the back, with the battery cover removed, showing the two AA cells:
Inside
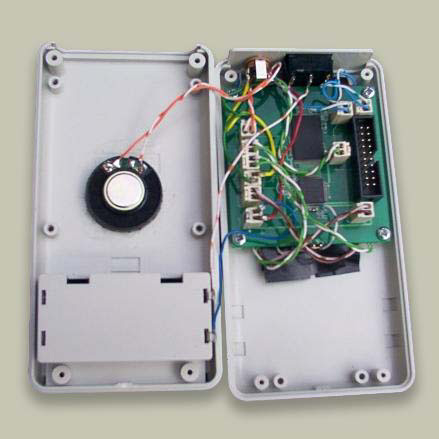
This is the inside - as you can see, a bit of a rat's nest! The NAND flash chip and the slave speech processor are visible here. The MCU is on the other side of the board with the buttons.
Credits
Thanks to John-Mark Kuznietsov for the background image of a printed Bible which you can find here.
Thanks to Brad Traversy for his video Build a Responsive, Mobile First Website - HTML5 & CSS3 which you can find here.
Thanks to Chris Coyier for Text Fade Out / Read More Link which you can find here.
Original Website
The original website can be found here.